December 20, 2012

I love it, I hate it

Our plan for the kitchen island was to have some kind of wood table at the far end that would be used for our daily meals.


I always thought it would be wonderful to do a live edge, walnut slab counter but was open to other suggestions.
It just so happened that while Steve was finishing our floors, he came across a very large, single piece of walnut at Exotic Woods in Burlington and texted me a picture of it.
It was gorgeous!  And just the right size, so we went ahead and bought it.


It was actually a bit more than 2 feet longer than we needed, so we cut off the end and will use that in the main floor powder room.


The slab did have some HUGE holes and cracks in it that needed to be filled.
Steve taped the back side of all the cracks and slowly, bit by bit filled them with epoxy resin.  This process took a lot longer than we expected.  We were actually starting to wonder where all the epoxy was going!  Seriously, he would pour in a cup or so of resin in one crack to top it up, and the next day it was completely gone!  As if he never poured any in at all.


But eventually it started coming together.  We left the epoxy clear instead of colouring it brown like many companies who make these tables do.  
I love being able to see into the cracks-- gives it a bit more depth, I think.


So, it was all working out and looking pretty much amazing.


But then Steve needed to shave down one side of the slab with a skill saw and asked me to hold the end steady while he cut.
In hindsight, I now realize that this was when it all happened!


See this nasty stuff here?  Actually it's just walnut sawdust. 
But it turns out I am allergic to it!!  
I have eaten walnuts many times in my life, and am not allergic to anything else that I know of.  But 2 days after getting my face and arms covered with the offending sawdust, I broke out in a horrible, itchy, red and swollen rash.  Contact dermatitis my doctor called it.  Similar to a poison ivy reaction.


I'll spare you the pictures of my face, but this was what my arms looked like for 2 weeks.
And did I say that it was intensely itchy?  Like wake-me-up-in-the-night itchy.
Benadryl and Claratin used with a prescription cream eventually cleared it up, but not in a hurry.


So of course the big question is, can I even use this gorgeous table now?  My sister is already trying to find a place for it in her house!  No sympathy.
My doctor seems to think I should be OK once it's sealed (which has been done now).  
We haven't been using it full on yet, but I have touched it a few times and seem to be OK.  
Thank goodness!


Steve thinks I'll appreciate it more after all it's put me through.
Maybe one day.  
For now, I'm still suspicious and just growl at it now and again.
Grrrrrr!


December 12, 2012

Moving in

Well, I'm exhausted, haven't eaten a decent meal in a week, and overwhelmed with my seemingly endless to-do list, but we are finally living in The Bennett house!
The whole family is really happy to be here.
The move out from our old house took a lot longer than expected.  We thought we de-cluttered enough to make it fairly easy work, but 10 years of stuff just seemed to be endless.  Toys, and paint cans, and junk drawers and stuff under the beds was seriously never-ending.  And of course, since we are living so close to the new owners, we couldn't exactly leave the place dirty either.  So the good part of a day was spent scrubbing, wiping, patching holes, painting and vacuuming.
But we got it all done, and this is what we're living with now.


This is the guest room--our current room of shame!  But it's not all that bad, really.
This is our kitchen/dining room/family room.
Although we are still waiting on our counters and oven (a story for another post!), it is pretty livable now.


The front living room isn't too bad either, except that none of our furniture really fits anywhere in this house--mismatched stuff everywhere.


I have been doing quite a bit of cleaning at this house as well.  And some unpacking.  But the problem is that we don't have organized space to unpack stuff to.  
I decided to tackle this right away by building our Ikea PAX units.  I had our contractor size our walk-in closet area to exactly fit 4 deep units on one side, and 2 shallow ones on the other.  
The plan worked out like a dream!  This is what the cubbies looked like before.
   

And this is how perfectly the PAX units fit.


With some of our stuff in place.


And the other side.
I need sliding doors and a few more shelves, but we're almost there.


In the middle, I mounted an Ikea mirror on hinges (I saw this done in the showroom and thought it was brilliant).


Behind it are hooks for necklaces.  
Very neat and tidy.


We've still got a lot of work ahead of us here, but at least we can comfortably live though the rest. 
And in the meantime, I'm really enjoying everything about this house.  Especially the view out the back.  
This is how we're falling asleep every night (partly because we don't have any blinds or drapes yet!).
I think it's absolutely gorgeous. It doesn't feel like we're even in the city. 


November 21, 2012

Red oak floors

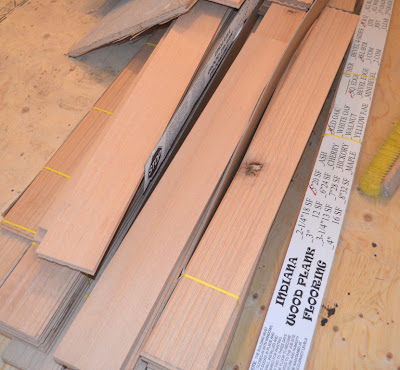
About three weeks ago, we got our hardwood floors delivered for the main and second levels.  After much waffling between wide plank reclaimed floors and unfinished oak, it finally came down to budget and we went with the oak.  I was hoping to at least get 7 inch wide oak planks, but that didn't work out either.   
So in the end, we went with quarter sawn, 5 inch wide, unfinished red oak in lengths varying from 1 foot to 8 feet.


I had a lot of flooring companies try to talk me into pre-finished floors since they are easier to install and have a more durable factory finish on them.  But I'm a bit old fashioned when it comes to wood.  That's why I love reclaimed floors so much!  
Site finished floors can be sanded to a super smooth finish with no micro-bevels between the boards and you can finish them any way you like.


If I had it all to do all over again, I might have chosen white oak since it doesn't have the pink undertones that red oak has.  But the stairs were done in red oak so I wanted the floors to match.
The quarter sawn boards have a more lined look to them than plain sawn oak which can have a pretty funky pattern in the grain.  I like the quiet feel of the quarter sawn oak and that they are more dimensionally stable so they shouldn't have as much movement with humidity changes.


I also prefer the look of long boards, especially in large rooms.  So I ended up ordering a bit extra wood and asked our installer to pull all the pieces that were smaller than 2 feet (unless he needed them on an edge).


He did manage to use a bunch of the little pieces in our closet that will eventually be covered over with Ikea Pax units.  So now we have a few unopened boxes that we can return. 


You might remember me previously mentioning that Steve agreed to finish our floors for us.  
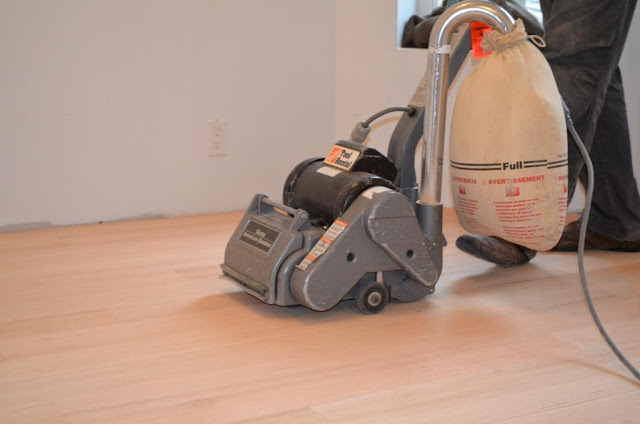
The first step was sanding.  This took way longer than I thought it would!  But Steve is a bit of a perfectionist.  
You have to start with a fairly coarse grain and move your way up to a very fine grain and finally screening.  The result is a floor that's as smooth as a baby's bottom!


I wanted to use an oil finish on the floors instead of the usual polyurethane.  I prefer the feel of an oiled floor underfoot and wanted a light natural or whitish colour.
Steve did a lot of research on this (since he likes oiled floors as well) and found a supplier of Rubio Monocoat.  This is a non-toxic, zero VOC, plant based oil that protects and colours the wood in one step.  They have 42 colours to choose from, but we chose "smoke".  It kept the oak pretty much natural but with a slight light grey in the grain.  As you can see in the picture, smoke has a hint of green in it as well which we thought would take some of the pink out of our red oak.  


We found the best method to apply the oil was with a sponge.


We then buffed the floor with a red pad and then with a white pad.


After about 12 hours, we could walk on it with socked feet and after about 48 hours you could feel how it hardened the wood.


I absolutely love the colour and the subtle sheen of the floor.  
So calm, warm, and natural.


And no off-gassing!  
It actually kind of smells nice when it's first applied, and has no odour at all after a couple of days.


November 17, 2012

DIY plywood floors

I was the laughing stock of my dad, our contractors, the hardwood flooring guy (who laid our main floors), Ron at Rona (since my dad HAD to tell him my plans for the maple plywood I was buying) and a couple of friends, but I went ahead with it anyway.
I (along with my ever supportive sister--she loves wacky ideas as much as I do!) laid 3/4 inch maple plywood on our entire third floor.

I didn't come up with this myself. I was originally introduced to plywood floors by Daniel and Valeria at Hindsvik blog. They laid these amazing plywood floors in their house and I was completely inspired to give it a go. Our third floor even looks like theirs!
But I also did a Google search and found that many other people have done their own version as an affordable and fairly simple finished floor.


We had a pretty level subfloor to start with but it was a bit noisy and our master bedroom is right below. So I decided to lay a thin foam pad to absorb some sound. Daniel and Valeria laid their floors over thin carpeting so I thought that thin foam pad would be OK.
I cut it to size and taped it down with tuck tape.


We then roughly laid out a few boards that were pre-cut by Rona into pieces that were 1 ft. wide and either 4 ft. or 8 ft. long. We thought this would give it the feel of old floorboards although I have seen others do it in squares or just 4 ft. X 8 ft. sheets.


When I was happy with our starting point, I started nailing in the boards. We used 1 3/4" finishing nails for most of this project.
In the end, I did end up using a few screws here and there because I found that some boards had a bit too much movement. This may have been because of the underlayment which had a bit of give. The screws did the trick though.


My sister brought along her third baby-- her Makita mitre saw to help us out. You need something like this for cutting and fitting the boards. A mitre box and a hand saw just wouldn't be enough.
We also had to do a bit of ripping on some edge pieces with the table saw.


I was getting pretty good with these saws by the end! My proudest cut was this little "L" to go around a structural bit of the house.
Perfection!


This is yours truly in action!
Wearing my "uniform" as of late.
A couple of 5 year olds in my daughter's class looked at me in disgust last week and said, "you've got huge holes in your pants!"
Ha ha! I can take it!


The floors starting to take shape.


After we laid all the planks, I set the nails,


and filled the holes with wood filler.


There were a few boards that had larger gaps between them so I filled those (and the screw heads) with wood filler as well.
I then gave the floors a light sanding.


And finally, 3 coats of water based, satin finish Varathane for floors.
The pad method for applying the Varathane (shown in the picture) did leave some marks for me, so I did the final coat entirely with a brush-- back breaking!


Ta da!!
This is the finished floor!


I kind of love it!
Here's the back bedroom with trim in place.


Can't wait to get some furniture in!


November 02, 2012

Odds and Ends

The house is really coming together quickly now and I find myself with no time to blog.  
The stairs were installed.  All six runs of them.


I was so excited to finally get them and so happy with the way they looked.  
I love the angled zig-zag profile.  
Eventually we will drywall the stringers so that the oak zig-zag is the feature that will stand out.


Unfortunately, after living with them for a few days, I realized that they made the treads on the first run (the most important run!) a half an inch smaller than the second run.  We did have space constraints in a couple of areas, but not there.
So I asked the stair guys to re-do them.  They were absolutely fantastic about it!  They took them away, re-made them, and re-installed them in 3 days.  
Our treads are now a comfortable 10 1/2 inches in this run.
When I thanked the main guy for doing such a great job, he said to me, "The sooner you're happy with your stairs, the sooner I'll get paid!"  
True enough.


The third floor 1/2 bath got tiled, and I built the high gloss grey Godmorgon vanity that will go in this room.


The entire house got painted including the big steel beam.  
Our painter preferred to work the night shift, which suited us just fine.  It meant he wasn't going to be in the way of our regular guys.
We went all white for the walls and ceilings -- Atmosphere by Dulux.  It has a very slight purplish tinge to it which makes it soft but not creamy.
The beam is Jet Black by Benjamin Moore.


The master bath is getting tiled.  
It took me a long time to decide on these tiles because I didn't want to be disappointed with this room.  I settled on dark grey 12" x 24" porcelain tiles for the floor with matching 2" x2" tiles for the shower bottom.  The walls around the shower will be 12" x 24" Carrera marble.
I love it so far.


And we got our hardwood delivered!
5" wide, 3/4 inch, unfinished, quarter sawn red oak.


 This wood has been a big source of stress for me lately.  
With all the drywall mud, scratch coating and floor leveling, the humidity in the house was way too high.  
The wood company recommends an ideal humidity level between 45 and 50 so the floors don't gap or buckle after installation.  
After getting the furnace going and running a de-humidifier for a few weeks, we finally have the humidity at just over 50.  Pretty good now, I think.  


Steve gave me a few colour samples of the Rubio oil finish we are using for the floors. 
I truly had a hard time deciding between the three on the left -- Smoke, Oyster, and White.
You'll have to wait and see which one we decided on :-)


And finally, they leveled and scratch coated the front hall (this just happened today).
It was terribly uneven since this area still had the original sub-floor with an original beam and joists underneath.
A lot of yelling and swearing over this one.  From the guys-- not me!  I just left them to it.  
They eventually got it done.


These are the tiles we're putting in.
24" x 24" grey Limestone tiles.  Although they're actually porcelain-- they're just called "Limestone".  
Same look, no sealing.
I really like the colour, the matte texture and the subtle swirling.


Tomorrow is floor day!  
The installer dropped off all his stuff this evening and starts laying the hardwood at 7:00AM.
So excited!